Disaster Recovery has been a long neglected action on my part. As such, when a disaster did strike, it forced me to into creating a Disaster Recovery blog post. I am now a better, more knowledgeable, AWS admin because of the incident. However, I have not be actively backing up my server, and as such, I did lose a blog post or two.
I was forced into disaster recovery because of self imposed actions. My AWS instance started acting up. I am not sure why, but it started to crash, regularly. So much so, that the CPU spiked, and I could not get back into the server. Obviously, if I cannot get in the server, I cannot fix it. So, I started poking around on the AWS management console until it terminated my instance, and all of my data was once again lost… and once again, it way my fault. My backups this time consisted of an AWS Snapshot just before the last major upgrade, a year ago, and a local WordPress backup from last month. I still have local copies of my git repository, and all of my other game assets. This means today’s activities need to include the following:
The Six Steps of Recovery
Of the original 12 steps, I feel I have completed five in other blog posts… All kidding aside, here is what I had to do to get the site back up and functional.
- Rebuild an AWS instance and point it to my old SnapShot. This is my first time doing this, so it will obviously take longer than I will really want. I also have to point the DNS to the new IP.
- Upgrading AWS, WordPress, and GitLab via yum
- Other items
- after upgrading I did not know my old WordPress password, so I had to reset that.
- upgrading WordPress themes and plugins to the newer versions
- add missing content to the major pages that needed it
- Evaluating what is missing from the blog posts, and adding the content a second time. I know my last backup did not contain images, so there is some rework to do there. While I was on vacation, I also changed the theme of my WordPress site. Much of that will need to be redone.
- ask Google to reindex my site as the structure as changed.
- Restore/reconfigure GitLab
- Setup a new backup strategy that keeps me more up to date
- Write all of this down to aid in future disaster recovery.
Step 1: Pointing a new AWS instance to an Old SnapShot
The general idea here is that an AWS instance is analogous to an old school bare-bones server (memory, motherboard). The SnapShot is analogues to the image of the hard drive that needs to be restored. The way I found it works is first you bring up the new “computer” with a new “hard drive” and make sure it works. Then you shut down the computer and swap out to the old hard drive image. I think AWS either created an extra step, or I found an odd way of restoring backups, but it worked so that is how it is documented here. Before embarking on this endeavor, I did some research. In short:
- Create a compatible ES2 instance of your previous system
- Start the new EC2 instance, then shut it down.
- With is shut down, right-click and detach the Volume
- you need to determine where the new HD is mounted (/dev/sda, etc.)
- you will need the instance ID to link the saved HD
- From your previous your Snapshot, right-click and create a new Volume
- Assign that Volume to the new instance ID with the same mount point as before
- Restart the new instance that now runs the old HD
https://amimoto-ami.com/2014/10/03/create-snapshot-restore/ http://blog.ravitezu.me/error-starting-aws-ec2-instancehttp://blog.ravitezu.me/error-starting-aws-ec2-instance
Here are some issues that I ran into:
Issue 1: Make sure you use the same security groups. I have more than one profile and my default is not my WordPress EC2 instance. This means my local public and private keys were a mismatch and I could not log in until I corrected that.
Issue 2: If you try to connect to the new system via SSH, etc, the IP address will be different than it was before. DO NOT CHANGE THIS OR THE Route 53 CONFIGURATIONS! Instead, use the Elastic IP address feature to set the new IP to report to the outside world as the old one. I spent about 30 minutes trying to log into WordPress, but the system kept getting mixed up between old and new IP address.
If, you did somehow change IP addresses on the server and do not have the Elastic IP configured, you can read how to repair the WordPress database on my old post here.
One those were fixed, I was able to see an old version of the server.
Step 2: Upgrading the AWS Server via Package Management
I love this step. To upgrade wordpress, GitLab, and the entire AWS web server, simply log into the Linux server and type:
#sudo yum update
I would like to say that it has never failed me, but there was that one time where I had to manually patch a GitLab file. I wrote a whole blog post about it, but that was lost in the crash. Luckily, GitLab was very responsive to the issue and had already pushed out a new build. To summarize, the old post, if you have an issue with GitLab, search their page:
https://gitlab.com/gitlab-org/release-tools/issues
Step 3: Getting WordPress Operational Again
Step 3a: Resetting the WordPress password
This is an optional step for those that remember what their password was a year ago. However, I did not. This means that I needed to reset the WordPress password of my blogging account gscott. While there are web-based tools such as phpMyAdmin, I do not try to expose more admin tools to the web than I need this means I needed instructions for resetting the password via MySQL directly. After some googling, I found this article to be the most helpful:
https://codex.wordpress.org/Resetting_Your_Password
Step 3b: Upgrading WordPress Themes and Plugins
Once the base system was up and functional, I needed to upload the latest theme and import/export tools. Here are the basic instructions:
Adding New Themes Manually (FTP)
- Download the Theme archive and extract the files it contains. You may need to preserve the directory structure in the archive when extracting these files. Follow the guidelines provided by your Theme author.
- Using an FTP client to access your host web server, create a directory to save your Theme in the wp-content/themes directory provided by WordPress. For example, a Theme named Test should be in wp-content/themes/test. Your Theme may provide this directory as part of the archive.
Here is the full content of the link:
https://codex.wordpress.org/Using_Themes#Selecting_the_Active_Theme
Here is what I did:
I recommend giving the directory two folders. One for the old theme and one for the new one.
# unzip customizr.3.4.22.zip -d /var/www/html/wp-content/themes/customizr_3_4_22
Archive:  /usr/share/wordpress/wp-content/themes/customizr.3.4.22.zip
   creating: customizr_3_4_22/customizr/
  inflating: customizr_3_4_22/customizr/comments.php
  inflating: customizr_3_4_22/customizr/footer.php
...
  inflating: customizr_3_4_22/customizr/style.css
# ls
customizr             customizr_3_4_22      index.php      twentyfourteen
customizr.3.3.26.zip  customizr.3.4.22.zip  twentyfifteen  twentythirteen
Doing so will give you both versions of the theme to choose from:
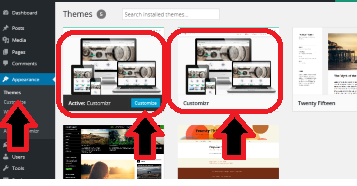
It should be noted, I had to change my sidebars and other widgets back in the new version, but overall the process took less than 10 minutes.
Similar to above, the import/export plugin also needed to be updated. It was placed in the wp-content/plugins directory.
# mv wordpress-importer/ bob
# unzip wordpress-importer.0.6.3.zip
Archive: wordpress-importer.0.6.3.zip
wordpress-importer.0.6.3 packaged
   creating: wordpress-importer/
  inflating: wordpress-importer/readme.txt
   creating: wordpress-importer/languages/
  inflating: wordpress-importer/languages/wordpress-importer.pot
  inflating: wordpress-importer/parsers.php
  inflating: wordpress-importer/wordpress-importer.php
# ls
akismet  bob  hello.php  index.php  wordpress-importer
Again, WordPress was great about installing side by side. Once I have shown that the importer functions correctly, I will detele the “bob” directory.
Step 3c: Restoring and Replacing Old Content
The Tools menu in WordPress offers an import/export feature. After I imported my old blogs, I had to go back over each one and review the content. Some links were broken, other images were missing. I also had to redo the new style that I rolled out for better search results. Overall it was not too bad due to an entire site crash, but it took some time.
Step 4: Restoring GitLab
The GitLab server is still up, but only has test repositories. I created a blog post of how to sync local repositories back to the GitLab server. That part went off without a hitch, until I tried to restore my default labels and reconfigure the server after the upgrade.
While doing this, I also did a “sudo yum update” – which updates all of my packages. most items worked well, however GitLab failed. It looks like I did one too many things at the same time (again).
When GitLab tries to start, but cannot, it creates a weird “Oops” page.
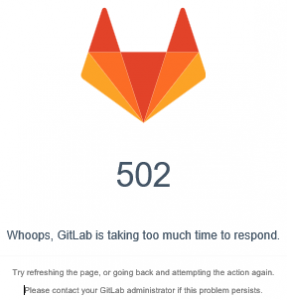
After 8hrs of googling, I came up with a solution! It was really simple actually. You see, I had copied my original file via Ctrl-C + Ctrl-V. Gitlab could not interpret it for some reason and unicorn was taking up 100% of my CPU. To correct the problem, I simply manually retyped the file inside my favorite Linux editor. I guessed what I needed to do because if typed “gitlab-ctrl tail” which gave me a complete log of everything going on. I found that every time I started, I was getting an error in issues_labels.rb on the first line that I changed… which was disovered by taking the default file, then changing one just my colors, then just my lables. – It was bascily an error bubble sort on the file with at restart of GitLab every iteration. My four goto commands were:
 # sudo vi /opt/gitlab/embedded/service/gitlab-rails/lib/gitlab/issues_labels.rb
 # sudo gitlab-ctl restart
 # top
 # cat /var/log/gitlab/unicorn/unicorn_stderr.log
I also had a separate terminal running
# gitlab-ctl tail
Each time I saw an error, I would change the file on that location and restart. It was slow progress, but eventually GitLab was able to restart without errors. As such, I am posting my issues_labels.rb.
Step 4: Finding Out What is Missing
Step 5a: Reading all my old Blogs and Taking Notes
On my site, there were tons of missing images. The backup only saves text. Images are (I believe) stored in MySQL, so they were not backed up. As such, I had to import all of the old images again.
There were also pages that I renamed over time. They showed up as “duplicates” – meaning the same page, with two different titles. I had to compare them side-by-side and manually merge them. Not fun, but doable because I generally took the later post.
The one big issues I saw was the import DID NOT Import pages with the same name. This means that if I updated a page, but it had the same name, I would not get the content. If I was not pressed for time, I would have deleted all of the pages and re-imported them. Since I was not very active blogging between posts, I simply read the pages that were there and made corrections for grammar, clarity and content. Not the safest thing to do, but it was all I was willing to stomach after all of the other issues I had dealt with.
Step 5b: Asking Google to Reindex the Site
Now that the site is back to where is was before, or at least a reasonable facsimile of it, I need to let Google know so it can reined the site. If my backup was identical to the site before, I would not see this as an issue. However, I lost and had to recreate data, so I expect some things to be different.
https://support.google.com/webmasters/answer/6065812?hl=en&ref_topic=4617736
https://www.google.com/webmasters/tools/submit-url?continue=/addurl
Step 6: My New Backup Strategy
Looking online, there does not seem to be a cost effective (automated) backup strategy for a single server. Right now, my bill runs about $9/mico instance I use and about $0.5 (50 cents) for storing my backups. As such, I simply going to manually make the backups as I need them. Now that I know how to backup and restore the SnapShots, I feel a lot more comfortable with the cloud storage I am using.
My next logical step would be to also AWS to backup my local PC, but I am currently happy with Microsoft’s One Drive and the AWS hosted GitLab server that I run.
In short, we will keep this Status Quo for now… but I will be creating a snapshot right after I finish the post.
Step 7: Write Everything Down
The good part about blogging about what happens, is it creates a natural log of how to fix it. The only issue I have run into is that when the site crashes, so does the blog. Luckally, my local XML backups from WordPress have aways given me enough content to get back to a functional server fairly quickly.
My next logical step here would be to create a single, easy to find page, that describes the steps I need to take so I do not have to search through the site’s entire XML file. I’ll add that one to my backlog on Trello.
Now that we are Done
If you want to delete the old snapshots or AMI instances that use them, AWS has a couple of good articles. I would, however, suggest creating a new snapshot of the newly working system before deleting anything. Also keep in mind that AWS does incremental updates, meaning the 1st backup is the entire drive and each additional snapshot only has the differences. Anyway, here are links to the AWS documentation:
http://docs.aws.amazon.com/AWSEC2/latest/UserGuide/ebs-deleting-snapshot.html
http://docs.aws.amazon.com/AWSEC2/latest/UserGuide/deregister-ami.html
(Un)documented Step 8: Backup Your Current Code – i.e My Next Post
Now that we are up and running, I need to make sure my current copies of the code get them back on GitLab. While this is probably unnecessary for those that backup more regularly, I had to spend some time syncing my GitLab server with my local repositories.
Now Please Create a AWS Snapshot
If you have had to do ANY manual effort to get to where you are now – now is the time to create a snapshot. Forgetting, or postponing it may in fact bring you back to this page sooner than you would like.
Bookmark Stonemillkids.com
You can at least bookmark this page so your next recovery will be much easier.